Android Setup With Cmdline
Hey folks, in this post, I’ll be mentioning the steps to set up the android environment for developing android applications using flutter without having to install Android Studio.
If you haven’t set up the Flutter SDK yet, head over to Install. If you wish to do it at a later time, you can still follow along.
Setup⌗
To start off, we’ll require to download the following files:
OpenJDK
The Java Development Kit is required so as to run commands over the command line using the sdkmanager.
For the installation procedure, hop on to OpenJDK and select the suitable version. At the time of writing this article OpenJDK 11 turned out to be the suitable one.
After everything’s settled, create an environment variable by the name JAVA_HOME and add the appropriate path to its value and while you are here, make sure to also add an entry to the Path variable using the JAVA_HOME to the bin directory.
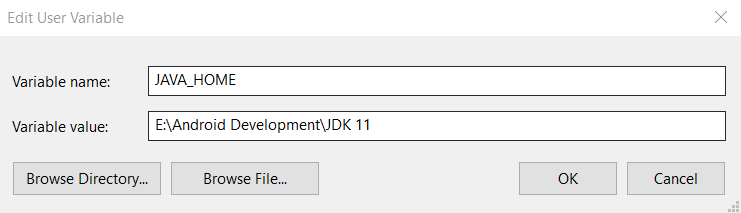
JAVA_HOME Environment Variable 
Updating PATH Variable And, finally to ensure that the JDK has been set up correctly, run
java -versionin your command line. If your output is similar to the one shown below, continue ahead, else check the above steps in case you missed out any.
Evaluating JDK Installation
Android SDK
To download the command line tools, scroll to the bottom of the page on SDK tools.
Make sure to extract the files in a separate folder, say Android SDK.
Also, transfer the contents of the cmdline-tools into Android SDK/cmdline-tools/latest.
Now, from the bin directory, open a command line and follow along the next section.
Command Line⌗
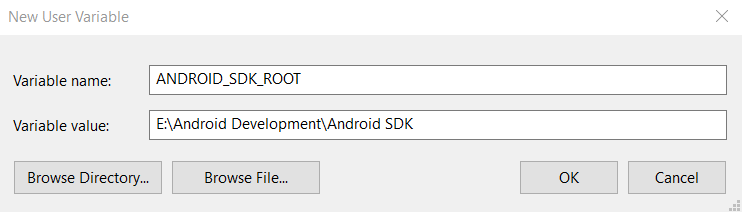
Now, before we begin with the command line, you will have to add an environment variable ANDROID_SDK_ROOT with the value as the path to the Android SDK which we earlier created, and now, we’re ready to go.
You can refer sdkmanager for better detailing on using sdkmanager.
So, we’ll start by adding the platform that we want to create apps for, in this case android-31. You can also add a different one as per your choice.
sdkmanager "platforms;android-31"
Moving on to the build-tools.
sdkmanager "build-tools;31.0.0"
If you’re wondering about the source of all these package names, you can find them by performing the below command.
sdkmanager --list
Another point to keep in mind is to maintain consistency with the API level, 31, in this case, throughout all packages.
Finally, execute the following commands one by one, and make sure to avoid executing commands for which folders have already been created.
sdkmanager "platform-tools"
sdkmanager "patcher;v4"
sdkmanager "emulator"
sdkmanager "tools"
And, as a final step, accept all the licenses using:
sdkmanager –licenses
At this stage you can run flutter doctor to evaluate if everything is fine and running.
Configure Output Device⌗
So, for the output device, you can either use your mobile phone or an android emulator, the steps for both are stated below.
Mobile Phone
For the mobile phone, you can view the Tutorial, explaining how to set up your mobile for developing android applications, along with solutions to some frequently faced problems.
Android Emulator
Before we begin setting up the emulator, we have a prerequisite of adding the following entries into the Path variable:
- ANDROID_SDK_ROOT\tools
- ANDROID_SDK_ROOT\cmdline-tools\latest\bin
- ANDROID_SDK_ROOT\platform-tools
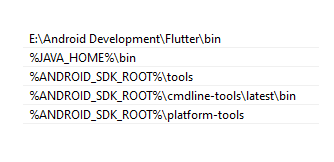
Updating Path Variable After you have updated the PATH variable, let’s proceed.
sdkmanager "system-images;android-31;google_apis;x86_64"Now, for creating an emulator, we’ll be using the avdmanager and you can read more about it on avdmanager.
You can choose an emulator of your choice from the list displayed using the
avdmanager listcommand.As for this post, we’ll be using pixel as our android emulator and you can follow the same using the below command
avdmanager \
-s create avd -n pixel -k "system-images;android-31;google_apis;x86_64"
Right before you can run the emulator, you’ll need to add an additional package using the sdkmanager:
For Intel Processors:
sdkmanager "extras;intel;Hardware_Accelerated_Execution_Manager"For AMD Processors:
sdkmanager "extras;google;Android_Emulator_Hypervisor_Driver"After the download completes, run the installer by the name of haxm-setup, in case of intel.
The purpose of this package is to accelerate the execution speed of the android emulator. For further steps go on to configure.
And, now for the moment of truth, execute
emulator -avd pixel -gpu host.
Winding Up⌗
That’ll be all for this post. If you found it helpful, do share it among your peers and happy coding.